
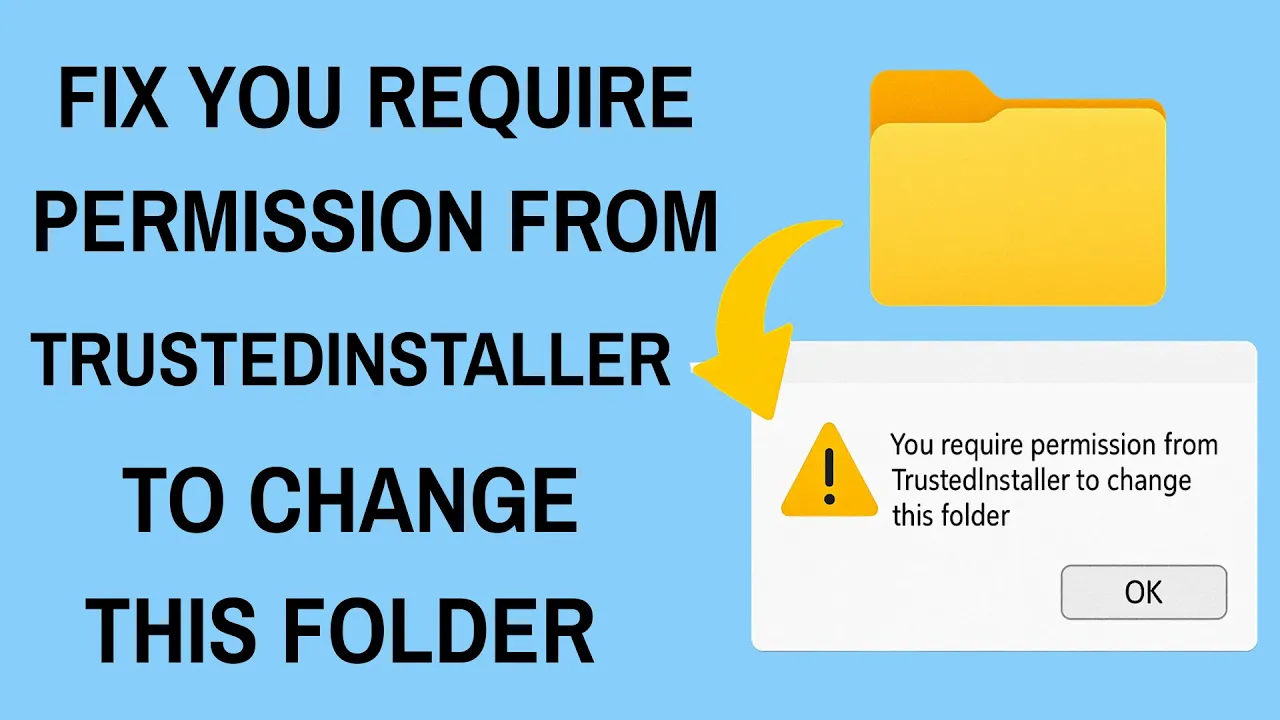
The “You require permission from TrustedInstaller to make changes to this folder” message in Windows can be really confusing and frustrating. It usually appears when you try to delete, rename, or edit certain system files or folders. That’s because TrustedInstaller is a built-in Windows service designed to protect important files from accidental changes. While this protection is useful, sometimes you may genuinely need to access or modify those files. The good news is, there are safe and simple ways to fix this issue. In this beginner-friendly blog, we’ll explain in easy language how to deal with the TrustedInstaller permission problem step by step, so you can take control of your files without hassle.
✅ How to Get Permission and Fix the Error — Step by Step
Here are reliable methods — both graphical (GUI) and command-line — to take back control from TrustedInstaller and give yourself access.
Method 1: Change Ownership & Permissions via File Explorer (GUI)
- Open File Explorer and navigate to the file or folder you want to change.
- Right-click → select Properties.
- Go to the Security tab → click Advanced.
- Next to Owner, click Change.
- In the “Enter the object name” field, type your user account name (or
Administratorsfor admin group), then click Check Names → OK. - (Important) Check the box “Replace owner on subcontainers and objects” — this ensures ownership is applied to all sub-folders/files if you’re changing a folder.
- Click Apply → OK.
- Now reopen Security → Edit Permissions — Add your account (if not already listed) and give it Full Control. Apply changes.
- After these steps, you should be able to modify, delete or rename the file/folder as needed.
Method 2: Use Command-Line (for difficult / system files)
If GUI fails or you want a quicker way — use built-in Windows commands via elevated Command Prompt or PowerShell:
- Open Command Prompt as Administrator (right-click Start → “Command Prompt (Admin)” or “Windows Terminal (Admin)”).
- Run the following to take ownership (replace
FullPathToFolderwith actual path):takeown /F "C:\FullPathToFolder" /R /D Y/Fspecifies the path/Rmakes it recursive (subfolders/files)/D Yconfirms prompts automatically
- Then grant yourself full permissions:
icacls "C:\FullPathToFolder" /grant %username%:F /T /C%username%is your Windows login name:Fstands for Full control/Tapplies to all files/subfolders,/Ccontinues on errors
After running these commands, you’ll own the folder and have full control — you can now modify, delete or rename as needed.
Method 3: (Advanced) Use Third-Party Tools or Add “Take Ownership” to Context Menu
If you often need to access protected folders, there are tools and registry tweaks that add a “Take Ownership” option directly to the right-click context menu. This avoids repeating manual steps every time. Many guides show how to create a .reg file that adds this option.
⚠️ Important: Always make a backup or restore point before using such tweaks — modifying system-level permissions can be risky.


