
Is your Windows 10 or 11 laptop running slow or struggling with heavy tasks? One simple trick to boost performance is by increasing virtual RAM—also known as the page file. Virtual RAM helps your computer handle more work by using part of your hard drive as extra memory. In this blog, we’ll show you how to increase virtual RAM step by step, so your laptop runs faster and smoother. No tech skills needed—just follow along and give your PC a speed boost!
🚀 How to Increase Virtual RAM in Windows 11/10 (Step-by-Step)
Step 1: Open System Advanced Settings
- Press Windows + R on your keyboard.
- Type:
sysdm.cpl - Press Enter.
Step 2: Open Performance Options
- Go to Advanced tab.
- Click Settings under Performance.
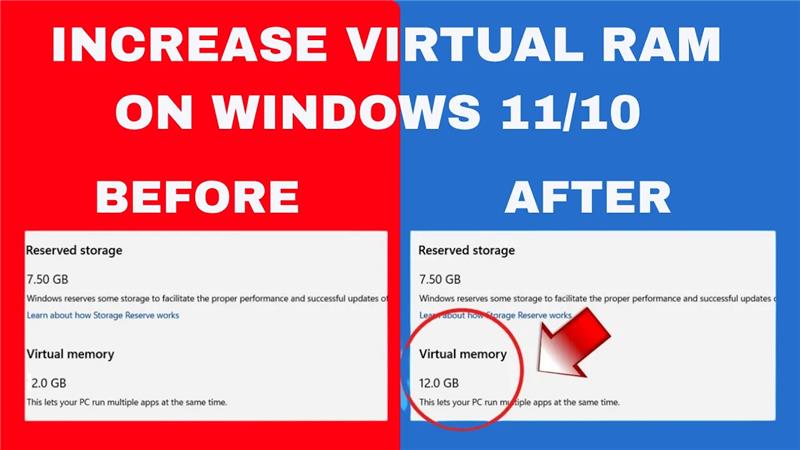
Step 3: Adjust Virtual Memory
- Go to Advanced tab again.
- Click Change under Virtual Memory.
Step 4: Set Custom Virtual RAM Values
- Uncheck: Automatically manage paging file size for all drives
- Select your C: Drive
- Choose Custom Size
Now, use this recommended calculation:
| Your Physical RAM | Initial Size (MB) | Maximum Size (MB) |
|---|---|---|
| 4GB RAM | 4096 | 8192 |
| 8GB RAM | 8192 | 16384 |
| 16GB RAM | 16384 | 32768 |
Example:
If you have 8GB RAM, set:
- Initial Size: 8192
- Maximum Size: 16384
- Click Set
- Click OK
Step 5: Restart Your Computer
Restarting applies the new settings and boosts performance.


