
Microsoft PowerPoint is one of the easiest and most powerful tools for creating presentations. Whether you’re a student, teacher, or working professional, learning PowerPoint can help you share ideas clearly with slides, pictures, charts, and even animations. The best part is—you don’t need to be a tech expert to use it! In this blog, we’ll give you a simple MS PowerPoint tutorial for beginners, showing step by step how to get started. It’s a skill that everyone should learn because it makes communication smarter and more effective.
🛠 Getting Started: Create Your First Presentation
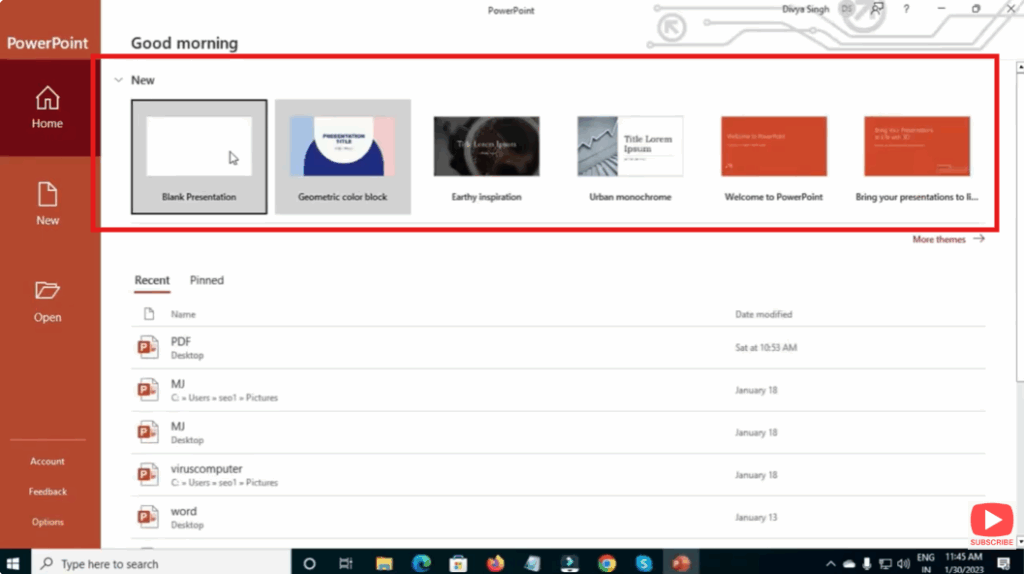
- Open PowerPoint and choose a template
- When you launch PowerPoint, you’ll see options for blank presentation or pre-designed themes. A theme gives you consistent fonts, colors and background.
- For beginners, starting with a blank presentation is fine—you can always apply a theme later.
- Understand the interface
- On top: the Ribbon with tabs like Home, Insert, Design, Transitions, Animations, Slide Show, Review, View.
- On the left: Slide Pane showing thumbnails of slides.
- In the centre: the Slide Canvas where you edit.
- At the bottom: status bar (slide number, design views) and a “Notes” area for speaker notes.
- Add new slides
- On the Home tab, click New Slide and pick a layout (Title & Content, Section Header, Two Content etc.).
- Use a good layout that matches your content type—to avoid crowded or imbalanced slides.
- Add text, images and content
- Click inside title or content placeholders and type your text. Keep text short and readable (e.g., 5-7 lines per slide).
- Use Insert → Pictures / Online Pictures to add images. High-quality photos or icons strengthen your message.
- Insert a chart or SmartArt (Insert tab) if you have data or need to show relationships/steps.
🎨 Design & Visuals
- Go to the Design tab, choose a Theme that matches your message.
- On Design → Variants you can change color schemes, fonts, or background styles.
- Avoid using too many fonts or colors—stick to 2-3 complementary colors and 1–2 fonts.
- Use Slide Master (View → Slide Master) if you’re creating a branded or consistent presentation across many slides.
🎬 Transitions & Animations (but use sparingly)
- Transitions: Go to Transitions tab → pick one (Fade, Push, Wipe etc.). Use it between slides.
- Animations: Select an object (text box, image) → Animations tab → choose effect (Appear, Fly In, Zoom).
- Tip: Use subtle animations—too many “fun” animations distract rather than enhance.
- Use Animation Pane (Animations tab) to manage sequence and timing of effects.
🖥 Slide Show & Presenting
- Click Slide Show tab → “From Beginning” or press F5 to start presenting.
- Use Presenter View to see current slide, next slide, notes and timer—all while audience sees full slide.
- During presentation: press B to black screen, W for white screen, Esc to exit.
- Practice timing, transitions and slides to ensure smooth delivery.
📝 Conclusion
Mastering Microsoft PowerPoint equips you with the ability to communicate visually with impact. From designing your first slide, applying a theme, adding content, to presenting confidently—you now have the foundational skills to get started. As you gain experience, explore advanced features like Slide Master, custom animations and interactive elements to take your presentations further.


