
Disk Management is a built‑in tool in Windows 10 and Windows 11 that helps you manage your hard drives and storage devices easily. With it, you can create, delete, or resize partitions, initialize new disks, assign drive letters, and format drives without using any extra software. It’s a simple and powerful way to keep your PC’s storage organized and running smoothly. In this blog, you’ll learn what Disk Management does and how to use it step‑by‑step to manage your disks and partitions efficiently on Windows 10 or 11.
🛠️ What Does Disk Management Let You Do?
Disk Management can help with tasks such as:
- Initializing a new disk
- Creating new partitions (volumes)
- Formatting partitions / volumes
- Extending or shrinking volumes
- Changing drive letters and paths
- Converting disks (e.g. from MBR to GPT)
- Managing external drives (USB / external HDD / SSD)
- Setting up drive status (online/offline)
These capabilities make Disk Management a core tool for disk/volume setup and maintenance in Windows.
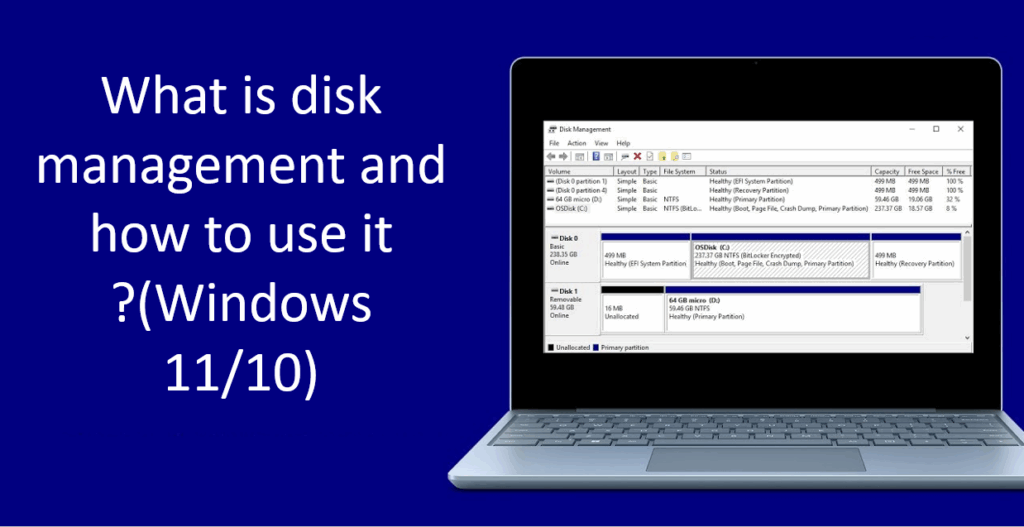
📂 How to Open Disk Management
To start using it, you first need to open the tool. The video shows the standard way:
- Right-click the Start button (or press Windows + X)
- From the menu, select Disk Management
This opens the Disk Management console where you see a list of drives, partitions, and their statuses.
⚙️ Using Disk Management — Key Operations
Once Disk Management is open, here are the main operations you can do (as shown in the video):
1. Initialize a Disk
- When you plug in a new disk, Windows may prompt you to initialize it.
- You choose a partition style: MBR (Master Boot Record) or GPT (GUID Partition Table).
- GPT is preferred for newer systems, especially with UEFI, and supports larger drives.
- After initialization, the disk shows up in Disk Management and can be partitioned or formatted.
2. Create / Format a New Partition (Volume)
- On unallocated space: right-click → New Simple Volume
- A wizard opens: choose the size (in MB), assign a drive letter, and format the partition.
- You can choose file system (commonly NTFS) and label (name) for the partition.
- Once completed, the new volume becomes usable and visible in File Explorer.
3. Extend or Shrink Volume
- Extend Volume: If you have adjacent unallocated space, you can right-click a partition and extend it into the free space.
- Shrink Volume: You can reduce a partition’s size by shrinking it, thereby creating unallocated space.
- These operations allow you to adjust partitions without deleting them (if space permits).
4. Change Drive Letter & Paths
- You can assign, remove, or change drive letters (e.g. D:, E:) by right-clicking a partition and selecting Change Drive Letter and Paths.
- Useful when you want a more logical labeling or reassign letters for consistency.
5. Formatting / Reformatting Existing Partition
- Right-click on an existing partition → Format
- Choose file system (e.g. NTFS), label, and whether to do a Quick Format or full format.
- Warning: formatting erases all data in that partition, so make sure to back up anything important first.


